Materials Needed:
- plywood, pressboard or other flat smooth wood
- square wood to make frame
- chalkboard paint
- paint for frame
- wood glue
- wood screws
- circular saw/table saw/jigsaw (any or all)
- drill
- astroturf (only for my "special" version)
- hot glue gun
A few weeks ago I was at Tuesday Morning and I really thought I scored big when I found a little chalkboard/easel for $19. Well, it's a great little find; however, as I tend to do, I thought I could make one that was bigger and better!
Turns out I was right...in my usual dig through the culled wood at Home Depot (if you don't know about this, you gotta check it out!) I found some tempered hardboard that had been torn/ripped. Lucky me, it was FREE! Now you can also buy it for a mere $14 at Home Depot...but it was nice to find it for free...
 | ||
| Here's the "unblemished" version available at Home Depot |
Now I am lucky enough to have friends with good tools, so I had someone cut it down to a square. You can use a circular saw, table saw, jigsaw...or if you're really scrambling, a hand saw to cut it to whatever size you want.
After your board is cut, it's time for the paint. You can buy a can of chalkboard paint for under $5 at your local hardware store. Make sure that you apply several coats and that it dries well.
Also, the fine print on the can reminds you to "prime" the finished paint by covering it with chalk (rubbing with the side) and then erasing it. I'm guessing that this prevents any of the first marks ending up being permanent (kind of like a screen saver for your chalkboard).
I also found (for 25 cents each) some square 1x1's in the culled lumber section which I used to make the frame. I measured (and didn't do that great of a job this time) and then cut at 45 degree angles to make the frame. For my next one, I will make the frame the same size as the board (maybe a little bigger) so that I can make this project simpler. In my case, I made my frame fit around the board. I have a chop saw (which makes my life wonderful), but you can use whatever you've got to make these angles.
 |
| Measured to make "frame" fit around the board...again, would do it differently next one. |
 |
| Chop saw at 45 degree angle |
Next, I used Elmer's wood glue to glue the edges together, I usually use screws but thought I would try something different this time. I glued the edges and clamped them overnight. Then it was time to paint.
After allowing the paint to dry, I put the pieces together. As I stated earlier, I was a bit dismayed to find that making the frame to fit AROUND the board may have been a mistake, but I made it work out in the end. Also, one of my 1x1's was a little skewed which left a gap anyway.
Now, if I had planned out my project/cutting differently I would be all done, using finishing nails to attach the board to the frame; however, I had to go a different route (which worked out just fine in the end but added a lot more time). I decided to make kind of a "window box" for my chalkboard. I first attached some braces to hold the bottom edges of the board (made with scrap wood and a miter saw/box)
Then I attached a 1x4 to the back side of the frame. I made sure that the board actually was just a little bit wider than the frame. Then I cut out two sides to my "window box" and another 1x4 that was the same size as the one on the back. I grabbed some silver spray paint from the paint box and painted up the pieces. I cut the sides at a 15 degree angle.
After this, I used a drill and wood screws to build the "window box". Instead of adding a bottom, I thought I would give it a creative flair and line the box with astro turf (also something I happened to have lying around...lol)
To add the astroturf I just used a hot glue gun.
I then made an eraser out of little carpet sample squares and a ribbon loop.
 |
| Finished eraser, not too bad! |
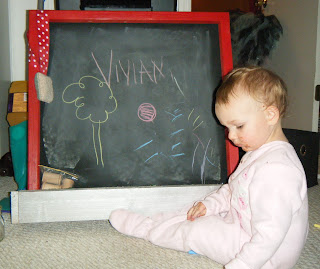
So my finished product ended up looking like this:
I've actually decided that I really like the "window" box on it...it is a good place to keep chalk (and anything else my toddler feels needs to go in there...)
And so ends the first version of make a chalkboard!


No comments:
Post a Comment