
Showing posts with label toddler. Show all posts
Showing posts with label toddler. Show all posts
Monday, January 28, 2013
Toddler Friendly Sliding Doors!
So, some of you know that in a former life I owned a medical supply company. In digging through old inventory I found an overabundance of suction grab bars. I'm actually selling a bunch of them on Amazon (hint hint). Anyway, I have found them to be great for many things, put them in the tub, etc. but an unlikely solution came to me one day when I was watching Vivian try to get the sliding glass door to the porch open and yet, she could not reach the handle. I stuck one to the door right at her level, and she now has her own custom door slider!
Want some of your own? I've got the lowest price on Amazon for these things!
Saturday, March 3, 2012
Soon to come...Sharpie + Toddler Solution
It was bound to happen, Vivian got hold of a Sharpie...so relatively soon, I anticipate posting a solution to this issue ;)


 UPDATE:
Received all kinds of ideas from my friends on Facebook, ended up using vegetable oil, but was also told that baby oil would work as well as mineral oil!


Received all kinds of ideas from my friends on Facebook, ended up using vegetable oil, but was also told that baby oil would work as well as mineral oil!
Sunday, November 20, 2011
Creative and functional Splat Mat
Have you noticed that so-called "splat mats" (the thingies that go under high chairs to protect your floor and allow for easy cleanup) are basically overpriced sheets of filmy plastic? So, when it came time to deal with this issue for me I came up with several solutions. First one was, of course, an actual splat mat that someone had given me. It was thin and not very aesthetically pleasing and when I tried to clean it with a cleaner that had some level of bleach in it, the Elmo design faded.
First solution:
Shower curtain.
This worked just fine and was easier to manipulate and clean; but it still wasn't what I was looking for.
Final solution:
Bathroom linoleum-type flooring.
I was in the process of re-doing my bathroom floors with this new product that you just cut and lay. It didn't have anything sticky on it, it just lay flat. I noticed it was relatively easy to cut with a utility knife (as I was doing the bathrooms). I had a good bit of excess laying around and one day I cut a square of it out and decided it would be my new splat mat. I was able to cut openings for my table legs AND I can scrub the heck out of it with anything I want! It stays put and it looks a heck of a lot nicer than anything else I tried!
 You can go to your local hardware store and look for "no-glue" vinyl flooring and you may even be able to find a remnant!
First solution:
Shower curtain.
This worked just fine and was easier to manipulate and clean; but it still wasn't what I was looking for.
Final solution:
Bathroom linoleum-type flooring.
I was in the process of re-doing my bathroom floors with this new product that you just cut and lay. It didn't have anything sticky on it, it just lay flat. I noticed it was relatively easy to cut with a utility knife (as I was doing the bathrooms). I had a good bit of excess laying around and one day I cut a square of it out and decided it would be my new splat mat. I was able to cut openings for my table legs AND I can scrub the heck out of it with anything I want! It stays put and it looks a heck of a lot nicer than anything else I tried!

Thursday, November 17, 2011
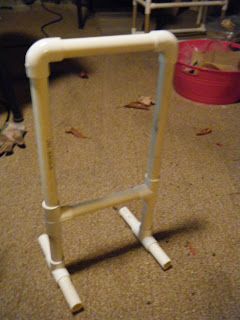
PVC + 5 Gallon Buckets = Great Toy Storage!
Here's a quick and easy PVC solution and a fun way to store toys or anything else...
 Vivian LOVES putting things away these days...I can only hope that habit will last! So I thought of making a small (but expandable) "storage shelf" that she can reach and where she can put balls and various other toys. This project took less than an hour.
Materials needed:

When adding the buckets, put the buckets face-down and bang the pvc onto them for a snug fit.

You could also paint the whole project now that there is awesome spray paint that bonds to plastic!

Materials needed:
- 1" schedule 40 PVC pipe. They sell this in 10' increments which is just about exactly what you need for this project.
- 4 x 1" PVC slip tees
- 6 x 1" PVC slip elbows
- 1 x 1" PVC 4-way cross connector
- 2 x 1" PVC end caps
- PVC Pipe cutter (I use a table/chop saw because I cut a LOT of PVC)
- 3 x 5 gallon buckets (can get at hardware or superstore in paint section)
- Cut 10 pieces measuring 10 inches
- Cut 2 pieces measuring 4 inches
- Cut 3 pieces measuring 2 inches
- Assemble as shown

When adding the buckets, put the buckets face-down and bang the pvc onto them for a snug fit.

You could also paint the whole project now that there is awesome spray paint that bonds to plastic!
MacGyver Gift Idea Today, Magnetic Chalk Board Cookie Tray!

So a little while ago I made a chalkboard with a nice wooden frame and a "windowbox" that holds chalk (and whatever else Viv wants to put in there). It's not too lightweight or portable so I thought I'd make the "travel" version. I'm pretty pleased with the finished product.

This one was really simple and easy. I bought a tray at Family Dollar (but I recommend getting one even cheaper because the non-stick coating won't be as nice). I sanded it and primed it (priming is a MUST, but don't use oil-based primer such as Kilz...I had a can of that handy so tried that first and it wasn't EVER going to dry on my tray).


Then I slapped some more random items onto magnets, put some chalk into the Altoids tin (which is now a removable "caddy" to put stuff in)....and Voila! How simple is that??


 |
| Definitely a Big hit! |
Monday, November 14, 2011
Holiday Idea of the Day – DIY Snow Globes
Snow Globes are a fantastic gift…when I was a child, my very first "collection" was of snow globes. In recent days, I have seen DIY snow globes at the drug store where you can insert your own pictures and, of course, I thought…there has to be a better way! So after much experimenting and adjustment, here is the finished product:


Materials List:
- Glass jar (baby food jars are GREAT). My community has a recycle center and I find a variety of glass jars there.
- Distilled Water
- Glycerin (you can find this at your local drug store in a very random spot, usually on the bottom shelf near the lotion)
- Spray Paint
- Sandpaper
- PVC pipe (optional)
- Glitter
- Clear shipping tape
- Laminating supplies (optional, if you don't have this see above item)
- Epoxy glue
You can go a couple of different directions with this project…a fun variation is to use photos. This is where laminating supplies come in. I happen to have a laminator but not everyone does. I bought mine years ago and I must say, I'm amazed at how often it comes in handy. These days you can purchase one for as little as $30 and let me say, I highly recommend having one!
For this project I used a combination of snow and glitter. To make snow, I used PVC shavings. I happen to make a lot of things out of PVC so this was not hard for me to obtain. I have seen where people have used a cheese grater to make PVC snow…I tried this (with a cheap grater from Dollar General or somewhere similar) and didn't have much luck. If you have a piece of PVC pipe and a saw, I would use the saw and, believe me, you'll get shavings from just cutting it. My porch used to look like a snow globe until I figured out how to replace a missing "shaver catcher" on my chop saw.
So here goes:
- Gather your supplies together.
- Clean your jars and remove any glue/labels. Best way to accomplish this is by soaking them. I tried spraying them with one of those goo remover sprays and soaking worked better.
- Paint your lids with whatever color you want.
- If you are putting items in your snow globe and don't want them to be floating around…sand the inside of your lid until it is rough and textured.
- If you are using photos in your snow globe, measure the height and diameter of your jar and make a collage or use a single photo that will fit. On the photos, I recommend making a circle out of them (like a toilet paper roll). Laminate your photo by either using a laminator or shipping tape. Make sure you get a tight seal. I laminated my collage and immediately rolled it into a toilet paper roll to make sure it didn't get too stiff and I would be able to maintain the shape of it. I used shipping tape to seal the ends together after the round shape was formed.
- Using an epoxy/waterproof glue, glue any items you are going to put into the globe onto your sanded lid.
- Fill your jar almost all the way with distilled water.
- Add glitter and/or snow.
- Add a few drops of glycerin.
- Screw the lid on tightly…however, give it a trial run first to figure out if you need to add more snow, glitter or glycerin. The glycerin is what makes everything drift around rather than floating to the top. Do this FIRST and then screw the lid on really tight.
- Enjoy!
Saturday, November 12, 2011
Holiday Idea of the Day, Crayon Wreaths
So I talked about making "toddler crayons" in a previous post. I came up with a fun variation for the holidays. In making crayons in a doughnut pan, the crayons are a little bit less stable so I came up with the idea to put two together. Then, I had some pipe cleaners laying around (of course) so I made little bows for them. You could use ribbon as well, that is just what was within arms reach at the time.


You can attach an ornament wire to these and they would make a great ornament gift (which can double as a crayon to doodle on wrapping paper when there is a lull on Christmas morning).


You can attach an ornament wire to these and they would make a great ornament gift (which can double as a crayon to doodle on wrapping paper when there is a lull on Christmas morning).
Thursday, November 10, 2011
Childproof your Fireplace
Childproofing can get EXPENSIVE! Being a hardware store junkie, I often find that many items that are sold under the guise of "child safety" are repackaged basic items you can find in a different aisle at the hardware store. Repackaged and, of course, repriced.
So...here's just one of my helpful childproofing tips in this arena. Pipe insulation. Yes, pipe insulation. I am a big fan of the plumbing aisle, and I have found that lots of things can be childproofed with pipe insulation.
I first discovered this when I was mounting a swing on my porch...it had seen better days as far as the rope goes, and we all hate prickly rope...I think that was one of my first pet peeves as a child. I cut some pipe insulation and put it around the rope and voila!
 But I digress...here are the basics...buy pipe insulation. You can get the basic no-frills kind (around $2) or you can get it with peel and stick edges OR you can get pretty black pipe insulation. Both are a little pricier but one point to remember is that the basic, no-frills pipe insulation has a split down it as well which can be pulled apart...so it's not that different. For most of my childproofing, I use the basic, no-frills. I splurged on the pretty black (for copper pipes) for my fireplace for aesthetic purposes. Here is the result:


Pretty darn simple, right? And about 1/3 the price of repackaged stuff!
So...here's just one of my helpful childproofing tips in this arena. Pipe insulation. Yes, pipe insulation. I am a big fan of the plumbing aisle, and I have found that lots of things can be childproofed with pipe insulation.
I first discovered this when I was mounting a swing on my porch...it had seen better days as far as the rope goes, and we all hate prickly rope...I think that was one of my first pet peeves as a child. I cut some pipe insulation and put it around the rope and voila!


Pretty darn simple, right? And about 1/3 the price of repackaged stuff!
Wednesday, November 9, 2011
Got Tutu's? Another PVC solution!
So there are lots of "Tu"-torials online about making no-sew tutu's (pardon the pun, I couldn't resist)...and, aside from a few that tell you to loop the elastic around your leg...very little about easier ways to work with your tutu in progress AND store your tutu's without worrying with pesky skirt hangers...that's most likely because they haven't found ME yet!
Unlike some of my other projects with PVC, this one is so simple that ANYONE could do it.
Supplies needed:

One tip, if you are making or displaying/storing tutus that are "toddler" size OR using hairbands then your cross pieces should be approximately 8 inches. In general, take the normal width of your tutu waistband and subtract 2 inches for your cross pieces.
Unlike some of my other projects with PVC, this one is so simple that ANYONE could do it.
Supplies needed:
- 1 piece (or shorter if you can get it) of 3/4 inch PVC. (PVC comes in 10 foot lengths. This makes it sometimes awkward to fit into a car or SUV; however, the 3/4 inch is more flexible so that tends to be less of a problem). Cost? About $2.
- A PVC cutter (in general, I use a chop saw because I am obsessed...but for the 3/4 inch, it's a cinch to cut by hand) Home Depot sells an easy ratcheting PVC cutter by Brasscraft for about $14. You can also use a hacksaw but that's kind of a pain.
- 4 - 3/4 inch slip tees
- 2 - 3/4 inch slip elbows


One tip, if you are making or displaying/storing tutus that are "toddler" size OR using hairbands then your cross pieces should be approximately 8 inches. In general, take the normal width of your tutu waistband and subtract 2 inches for your cross pieces.
Tuesday, November 8, 2011
Easy Chalkboard for Kids!

Materials Needed:
- plywood, pressboard or other flat smooth wood
- square wood to make frame
- chalkboard paint
- paint for frame
- wood glue
- wood screws
- circular saw/table saw/jigsaw (any or all)
- drill
- astroturf (only for my "special" version)
- hot glue gun
A few weeks ago I was at Tuesday Morning and I really thought I scored big when I found a little chalkboard/easel for $19. Well, it's a great little find; however, as I tend to do, I thought I could make one that was bigger and better!

Turns out I was right...in my usual dig through the culled wood at Home Depot (if you don't know about this, you gotta check it out!) I found some tempered hardboard that had been torn/ripped. Lucky me, it was FREE! Now you can also buy it for a mere $14 at Home Depot...but it was nice to find it for free...
 | ||
| Here's the "unblemished" version available at Home Depot |

Now I am lucky enough to have friends with good tools, so I had someone cut it down to a square. You can use a circular saw, table saw, jigsaw...or if you're really scrambling, a hand saw to cut it to whatever size you want.

After your board is cut, it's time for the paint. You can buy a can of chalkboard paint for under $5 at your local hardware store. Make sure that you apply several coats and that it dries well.

Also, the fine print on the can reminds you to "prime" the finished paint by covering it with chalk (rubbing with the side) and then erasing it. I'm guessing that this prevents any of the first marks ending up being permanent (kind of like a screen saver for your chalkboard).
I also found (for 25 cents each) some square 1x1's in the culled lumber section which I used to make the frame. I measured (and didn't do that great of a job this time) and then cut at 45 degree angles to make the frame. For my next one, I will make the frame the same size as the board (maybe a little bigger) so that I can make this project simpler. In my case, I made my frame fit around the board. I have a chop saw (which makes my life wonderful), but you can use whatever you've got to make these angles.

 |
| Measured to make "frame" fit around the board...again, would do it differently next one. |
 |
| Chop saw at 45 degree angle |
Next, I used Elmer's wood glue to glue the edges together, I usually use screws but thought I would try something different this time. I glued the edges and clamped them overnight. Then it was time to paint.

After allowing the paint to dry, I put the pieces together. As I stated earlier, I was a bit dismayed to find that making the frame to fit AROUND the board may have been a mistake, but I made it work out in the end. Also, one of my 1x1's was a little skewed which left a gap anyway.


Now, if I had planned out my project/cutting differently I would be all done, using finishing nails to attach the board to the frame; however, I had to go a different route (which worked out just fine in the end but added a lot more time). I decided to make kind of a "window box" for my chalkboard. I first attached some braces to hold the bottom edges of the board (made with scrap wood and a miter saw/box)

Then I attached a 1x4 to the back side of the frame. I made sure that the board actually was just a little bit wider than the frame. Then I cut out two sides to my "window box" and another 1x4 that was the same size as the one on the back. I grabbed some silver spray paint from the paint box and painted up the pieces. I cut the sides at a 15 degree angle.

After this, I used a drill and wood screws to build the "window box". Instead of adding a bottom, I thought I would give it a creative flair and line the box with astro turf (also something I happened to have lying around...lol)


To add the astroturf I just used a hot glue gun.
I then made an eraser out of little carpet sample squares and a ribbon loop.


 |
| Finished eraser, not too bad! |
So my finished product ended up looking like this:

I've actually decided that I really like the "window" box on it...it is a good place to keep chalk (and anything else my toddler feels needs to go in there...)

And so ends the first version of make a chalkboard!


Subscribe to:
Posts (Atom)